Entertain Outdoors with Summer Crafts
July 24, 2014 at 11:22 a.m.
(Merrick White/Northwest Prime Time News)
(Family Features) Your backyard is the perfect setting for summer celebrations, and the outdoors provide ideal inspiration for crafts that lend a personal touch to your festivities.
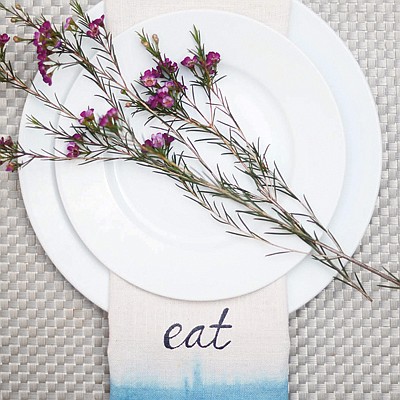
Al fresco dining
When setting the table for a sunset meal on the patio, it’s the extra touches that count, from a centerpiece of freshly cut flowers to the linens at each setting. Take a note from nature and mimic the vibrant floral colors to make custom Dip Dyed and Stamped Cloth Napkins, a project from the crafting experts at Jo-Ann Fabric and Craft Stores. Add an extra special touch by incorporating words such as “eat” or “friends” onto each piece, or create a custom memento by stamping each guest’s name into the fabric.
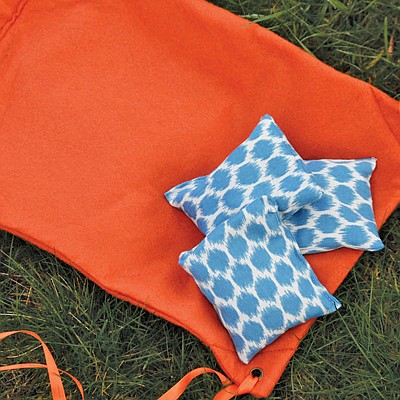
A gaming good time
Guests of all ages can gather round for a little light-hearted competition with your homemade Bean Bag toss game. Select fabrics that correspond to your overall theme for a more elegant look, or go whimsical with bright summery shades that add to the fun.
For more craft ideas and inspiration, visit www.joann.com.
Dip Dyed and Stamped Cloth Napkins
Project courtesy of Merrick White, www.merricksart.com
Crafting time: 1-2 hours
Skill level: Some experience necessary
Supplies and Tools:
1 yard lightly colored linen
Scissors
Fabric dye
Basic sewing supplies
Sewing machine
Freezer paper
Pencil
Iron & pressing surface
Fabric paint/sponge brush
Optional: Plastic stencil or stamps
Cut 20-inch-by-20-inch squares of linen, and then dip dye end of one side (using instructions on dye).
Once dying is done and dry, hem around entire square napkin.
For lettering stencils, draw letters on freezer paper, cut them out carefully, and iron freezer paper onto fabric, shiny side down. Carefully sponge paint over freezer paper stencil. (Optional: Use plastic stencil or stamps for lettering).
Allow paint to dry completely. Remove freezer paper.
Bean Bags
Project courtesy of Meg Padgett, www.revamphomegoods.com
Crafting time: 1-2 hours
Skill level: Some experience necessary
Supplies and Tools:
Supplies and Tools:
Duck cloth, outdoor or heavy-duty decor fabric
Scissors
Basic sewing supplies
Sewing machine
Dried beans or corn for filling
To make three bean bags, cut out six 4 1/2-inch squares.
Place right sides of two pieces of fabric together and pin three sides in place.
Double stitch a 1/4-inch seam around three sides.
Turn bag right side out and fill 3/4 full with dried beans or corn.
Fold in rough edges and pin opening closed.
Double stitch a 1/4--inch seam to close bag.
Repeat for remaining bags.
SOURCE:
Jo-Ann Fabric and Craft Stores
Latest Stories

Where To See Wildflowers — And Avoid the Crowds
So, if you want to sing “The Hills Are Alive…” to the birds, rodents and you don't want to fight for parking or have hordes of people in your photos, here are the trips for you
READ MORE...
Volunteers Essential to Protecting Elders in Long Term Care
The Washington State Long-Term Care Ombudsman Program advocates for the rights of residents living in long term care
READ MORE...
55+ Travel Club
Be on the lookout for news about an exciting new Northwest Prime Time venture, the Northwest Senior Travel Club
READ MORE...
Steps Toward a Healthy and Independent Life
This workshop is entitled Steps Toward a Healthy and Independent Life
READ MORE...